


© all rights reserved G W Howe 2017 - 2020
Models
Maintaining the Wren locomotive
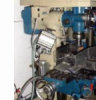
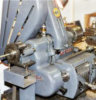
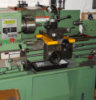
The Wren was looking reasonable given the work it had done but the paint on the saddle tank had a few chips and scratches on it and was looking dull. I was not in the mood to start a major paint job but as the saddle tank is easy to remove and I had a tin of matching paint on the shelf I decided to give it a go. The job of spraying was fairly straight forward and was done quite quickly. As with most paint spraying tasks it takes longer to clean the spray gun afterwards than the actual painting. There was however the need for lining! Previously I had borrowed a professional lining tool which did most of the lines but due to my inexperience the corners had to be done by hand. I wanted desperately to design a new lining tool to ensure the finish was acceptable but despite my various thoughts I have not yet come up with anything. The lining was subsequently done using an old ink stencil pen I had from my early days in the drawing office and surprisingly it worked reasonably well with paint instead of ink. I used a permanent marker pen to initially outline the lining tracks so that the stencil pen could paint over the top. If only I could make a paint marker pen perform as well as the bog-standard marker my quest for a new lining tool would be over! With the saddle tank finished it made the rest look worse than ever. I then decided that rather than go in for a major strip down to paint the boiler barrel and cab I would just touch up the chipped bits and put my efforts into checking out the motion and restoring the steel bits back to their former shiny glory. As the engine had done so much work it would also be an opportunity to check out the wear in the bearing surfaces. And so the motion was stripped down which is not a major task and takes but a few hours. Reassembly is another matter as I prefer to take time doing this. Cleaning all the metal parts is very time-consuming and despite soaking in various solvents the WD40 layers were there for ever! Of course I could use emery cloth and did so for the first coupling rod but even that took some hours and hard work. At this stage my appreciation of WD40 started to change and I vowed that in future another method must be found. By coincidence, I was in the kitchen and using a stainless steel cleaning pad, similar to wire wool of old and decided that maybe this would work on the loco. Notwithstanding the complaints from my better half it proved to be very effective and when used with a mixture of white spirit the steel parts started to shine once more and the pad showed no evidence of scratching unlike the course emery. I now have a few spare pads as part of the workshop essential cleaning equipment. Having cleaned all the bits it was now time to inspect and either adjust or re-make the bearing parts. At this point I wish to state that the design of this engine by Ken Swan follows full-size practice especially in the case of the rod bearings which are based on a marine-type design. In most cases I reasoned that some judicious scraping and refitting plus some spacers would allow the bearings to fit as initially designed. So each bearing was separated from the rod and inspected for the tell-tale marks of wear grooves and then re-assembled to feel for fit and any slack. Bear in mind this engine has done nine years of constant hard work so I was expecting each bearing would need some considerable scraping and re-fitting. I even bought from Ebay a set of two pristine Moore and Wright scrapers for just this job. After a few hours checking, to my surprise I found that each bearing was just as good as the day they were first fitted! No visible wear grooves and no sloppiness. I merely had to re-assemble the whole motion. Now gleaming brightly I knew it was hopefully good for another nine years! Even the cast iron guides on the Hackworth gear were no worse than expected. These will always have some play in them due to the design of the small bearing surfaces but in terms of affecting the valve timing it was negligible. Finally I should like to re-state that whilst one has to make and fit these parts properly in the first place I think it is largely down to the basic design principles adopted by Ken Swan that have ensured a lack of wear. It is essential that the engine is looked after well and for this my thanks go to Jack Dibnah who has made sure all bearings are lubricated before and during running plus at the end of day cleaning down. As for using WD40, I am not sure. It certainly prevents rust and the de-watering properties work wonders if the engine is put away wet. I am trying various new treatments of oiling which basically consists of a cloth pad impregnated with a mixture of oil and thinners plus a touch of WD40 to drive off the water. Hopefully, this diluted WD40/oil concoction will protect but not discolour the bright parts so badly. The loco is now almost ready for work, the motion has the new protection treatment applied, the paint-work looks reasonable and will pass for the time being plus the bearings are checked and good to run. It will need another boiler test before returning to the track so that will be the next task and then it's over to Jack's capable hands once more to give rides to the many visitors. Update - November 2009 Well the above was completed almost 2 years ago and as August arrived so do the Wren from its working holiday in the Park. As expected Jack had looked after it well and i noticed a new addition - it had acquired a three tone whistle! Not that I mind but this type of whistle is not what you might expect on a hard working yard engine but it is harmless enough, for the time being! There were a couple of major problems which happen with age - the wheel tyres were worn down on the front wheels to a razor thin edge and being cast iron very likely to break away. I recall another engine at the Park which had a big chunk of flange missing and it did look rather sad though still serviceable. The other problem happened whilst at speed and the engine apparently hit an obstacle and fell over to its side. Now thankfully the Wren has the drain cocks arranged up high so these did not get damaged unlike many engines which suffer the indignity of a fall and the cocks get bent or snapped away from the cylinders. The major blow was evident in that the cylinder covers (stainless steel) had been badly creased and the paint annihilated - the making of the cover plate is not that easy, it looks as if it is but there is the small challenge of matching fastening screw holes with those in the cylinder, so this was likely a long time in repair. Jack was quite keen to turn down the wheel flanges and then form some new ones but this means the wheel diameter is reduced and for me that means it looks wrong! No, the only solution is to turn off the flanges and shrink fit some new steel tyres. The wheels are well over 6" diameter and so not the sort of readily available stock and getting them flame cut from steel plate 1" thick is not a job locally. It looked like the engine was going to be out of use for some time plus the fact that I did not have a lathe capable of turning the mass of metal etc. As happens my good friend Jack, a man of many skills, turned up at the house and promptly delivered 4 round blanks of steel - they had come from a hydraulic ram somewhere - I prefer not to ask to many questions as to sources but suffice it to say we were in business once more. Jack then offered to do all the turning and fitting of the new tyres so I set about stripping the motion to remove the wheel sets. Fortunately, my workshop (garage) has about 10 foot headroom and a large steel beam onto which I attach a chain pulley lift. This arrangement is worth everything when it comes to working under the engine and makes life so much easier. With wheel sets removed and delivered to Jack I set about stripping all the motion to inspect and clean it. Once again there was no apparent wear in the bushes (amazing) and soon the rods and motion gear was boxed ready for refitting. The crunched up cylinder cover looked a more difficult task but buried deep in my workshop was a set of panel beaters form tools and hammers (all made in China) and whilst not the best quality they might just do the job of reshaping the cover and so avoid a remake. After an hour or so the cover was as good as new and all the creases had gone so all that remained was to paint both covers (the other was not damaged but the paint work was chipped). A few weeks later Jack turned up with the wheel sets assembled - now I did ask that he left the axle box halves so that I could decipher my build marks but he said it was no big deal and so fitted new felts and pinned them into place. My wife had arranged to go away for a short break and so this was the opportunity to devote this time to the rebuild. I knew from previous experience that this was a long job and for me fitting is the important task if the engine is going to run well and not wear. As per full size practice I set the wheel sets on a bench and with the chain pulley lowered the engine to them but although the back set fitted there was no way the front would fit! After a good deal of measuring and head scratching I decided the only solution was to remove the axle boxes and try-fit each to the horns and this is where it became evident that whilst Jack had interpreted my markings correctly the axles were wrongly positioned and needed rotating on the axle by 180 degrees. I know, they should fit equally either side but as I said I spend a lot of time fitting parts and although the boxes are almost the same size the scraping done to make them initially fit meant that they would only go on one way. Now I remembered the reason why I told Jack not to assemble them but only when it came to fitting in the horns - still job all done, the timing checked and slightly altered and waiting for a compressed air test.GWH Engineering
creative engineering in a home workshop


