


© all rights reserved G W Howe 2017 - 2020
Articles
Article describing how to keep tools sharp
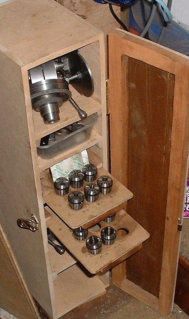
Inevitably every home workshop machinist needs to maintain and keep tools sharp in order to cut metal cleanly and produce good work. That statement may seem obvious yet I have seen lathe and milling cutting tools that are a long way short of sharp and the resultant work often leaves a lot to be desired. There are, of course, many books written about the theory and technical aspects of sharpening tools and relief angles etc. However the typical home workshop enthusiast simply wants to make things and sometimes neglects these finer details and actually ends up making the job a lot more difficult than it should be. I am of the opinion that the home workshop is completely different from professional production environments and as such we need to understand and respect the limitations of the equipment we use and the type of cutting tools. Once you accept it is a completely different environment (for the majority of home workshops) then it becomes obvious that all cutting tools need to be sharp, preferably low cost and simple to sharpen. Let's start by considering the major difference of the machines in the home workshop and those in professional workshops. The most obvious difference is the size and cost of machines. A small Myford lathe is an incredible design which can be used to machine metal objects which are comparatively too big but because this is what we have then the home lathe is pressed into coping with a vast range of different tasks. In the specific case of the Myford lathe because of its small size it lacks mass and in many cases mass is what enables cutting forces to be absorbed and large depths of feed to be made. The same analogy is equally true for the home milling machine. Because of this the home machinist has to ensure tools are sharp, depths of cut, feed rates and speeds are reduced from that of the larger machines. The only disadvantage is one of production time because several passes may have to be made. The common factor is that cutting tools must be sharp! Most modern production machines have now moved onto carbide inserts and in so doing increased cutting speeds and feeds whilst maintaining accuracy. So, for the home machinist having the capability to sharpen cutting tools is essential and as a minimum a good bench grinder is needed but to simplify matters the introduction of a Tool and Cutter Grinder (T&CG) makes the sharpening task dead easy. A T&CG can be very basic, as in the case of a bench grinder with homemade add-on guides and rests, or similar to the Stent, Quorn, Worden or many other designs available. In my case I made the Stent as the basic set-up and operation is very easy though it does have limitations when sharpening more sophisticated tools. In the case of this article I am only interested in the common cutting tools like those used in the small lathe or milling machine. Many newcomers think that building a machine that is very versatile is the best decision but quite often these machines require a lot of set-up time. Consider the type of tools that you will want to sharpen and then decide on the type of T&CG design that is best suited. There are a great many tools in the workshop that can be sharpened but sometimes the set-up complexity and skills required mean that it may be a more sensible decision to replace these tools.Drills
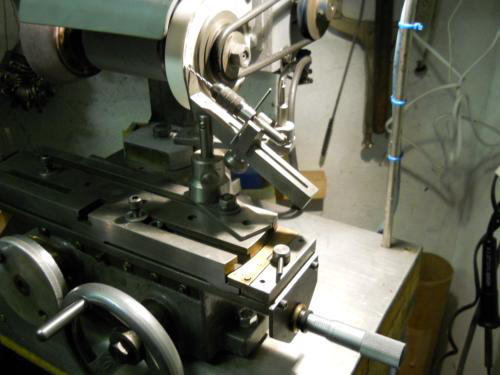
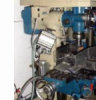
There are many different techniques and jigs available to enable drills to be sharpened. I always admire those expert shop-floor engineers who sharpen drills by hand using a bench grinder. It looks easy but it isn't and there are many reasons why it is better to invest in a special jig designed specifically to sharpen drills. The crucial requirement for a drill is that it cuts metal easily and produces a consistently accurately dimensioned round hole. I made the jig designed by GH Potts and this has proved to be excellent but not so for small diameter drills! Small drills are difficult simply because they are small and setting the drill in any jig is challenging! Whilst I use a very crude and effective jig (similar in concept to the Potts) for small drills this is a case where it may just be cheaper to buy replacement drills, especially in the case of 'micro' drills. Note the micrometer head used to ensure very fine feed.Lathe Cutters
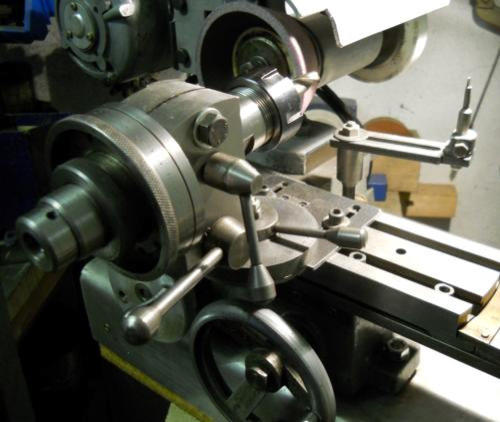
The first requirement is for the T&CG to be able to set grinding angles by way of guides so that relief angles are included. The actual relief angles are not that critical but generally as long as a leading edge of a cutting tool does the cutting and the chips have room to clear then metal will cut with ease. For lathe tools, I tend to keep to a basic rule of 5 degrees for relief angles and use a fine diamond hone to dress the cutting edge after grinding so that it is free of grinding serrations and very sharp. The tool rest I made for lathe tools as an attachment for the Stent was, at the time, an experiment in making a ball joints (similar to a photographic tripod head) but basic hinged guides are perfectly suitable and using any such guide ensures correct angles. Free-hand grinding on the bench grinder is quite effective and quick but a T&CG ensures the correct angles and 'flat' sides rather than sides matching the grinding wheel radius. Whilst such tools having a radius side cut well they do not present the best relief angle since a radius is a continuously changing angle! Added to which, the cutting edge is often weak and has a tendency to chip or lose its keen cutting edge.Milling Cutters
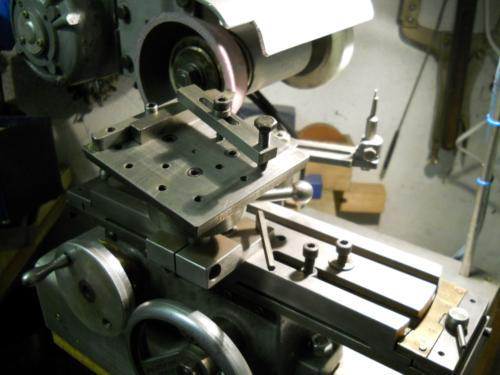
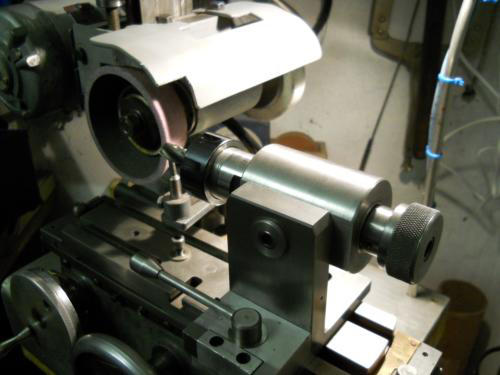
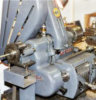
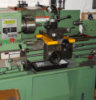
Sharpening milling cutters requires the use of a T&CG as it is completely impossible to grind freehand. Milling cutters are relatively expensive and once again industry has moved on to insert cutters or 'throw-away' cutters - for them sharpening is simply too costly in terms of time and accuracy. Once again, in the home workshop time is not a major problem and one can easily get 5 or more re-sharps for each milling cutter including end and side cutting edges. Accuracy clearly suffers in terms of diameter since a new 0.5" diameter cutter is reduced after every grind but this really does not matter and is, in many cases, an advantage! To mill a 0.5" slot in theory, is done using a cutter 0.5" diameter but in practice, on a small (less mass) milling machines, the end result will be a slot too wide. Slot cutters (two cutting edges) are to be preferred but often still cut wide. Multiple cutting passes allows the machine operator to concentrate on a single 'sizing' side of the slot thus absolute accuracy. First, consider sharpening of the end teeth cutting edges. I made a jig for the Stent which was largely based on a design by D Brookes and utilised ER25 collets and holder to ensure rotational accuracy. It is a fallacy to get wound up with extreme accuracy and as long as the collets can produce a minimal run-out then the cutter will work fine. The key requirement is for the jig to have some form of indexing to cater for two, three or four cutting edges and for relief angles to be set. I tend to always use the same angles, 5 degree for primary and 15 degrees for secondary when used to cut mild steel but these can be adjusted for other materials. The Stent has a table, on which the jig is fixed, which also rotates about its centre and being 10" long provides easy and accurate setting of very small angles. In the case of end teeth cutting edges I have found that it is better for the centre of the cutting edge to be slightly lower ('dished') than the outer edge. This prevents a tendency for the cutter to skid and makes a cleaner cut. The angle is only about 0.5 degree and the rotating table on the Stent makes this a very simple task to set up. Next, consider the side cutting edges of a milling cutter. These are more complex because they are in a helix profile along the length of the cutting edge and once more a jig is required. This is a simple jig which again uses ER25 collets and holder which rotate in ball bearings. The ER25 collet holders come in all shapes and fortunately a parallel shank is available. The jig is made such that the spindle arrangement can be retracted away from the grinding wheel by a simple lever/hinge under spring pressure. A lever retracts or engages the cutter to be ground and if you start grinding from the cutter end towards the collet end then it is necessary to move the cutter away from the grinding wheel when the grinding is finished for an edge to enable the jig to be moved back to the start position. Grinding these helix edges is actually very simple. A lip rest is needed to set the cutting edge height and if the complete table including the jig is traversed and the collet holder is kept under hand pressure to rotate it to be in contact with the lip rest then the cutting edge is ground uniformly along the cutter length. This may seem difficult but is actually very simple and requires a short amount of practice to produce a good clean ground edge. The major difficulty when grinding and sharpening tools is to remove the minimum amount of the tool for each grind. This may seem obvious but in practice is difficult. To sharpen any cutting edge needs very little grinding as you are just establishing a new cutting edge. From personal experience I find that the trick is to recognise when cutters are worn by seeing and hearing the performance of the cutting edge and chips produced. Once a cutting edge breaks down then the finish is visibly worse, the sound of the cutting changes and the chips get hot. Use an eye-glass to inspect cutting edges and identify any signs of blunted or rounded edges because this means it is time to touch it up on the T&CG. Finally, comes the choice of cutting tool composition. As mentioned earlier. Carbide inserts are now common place and for the home machinist an obvious choice but I am not over impressed with these especially when used on the lathe. The problem is the edges of the insert can easily chip and is useless thereafter and these are expensive to replace and difficult to re-grind. Brazed carbide tips are better as they tend not to chip edges but require a diamond wheel to grind a new sharp edge. High speed steel is now relatively cheap and very long lasting but make sure it is a good composition, there are many variations and some HSS is soft and loses its cutting edge very quickly but is easy to grind. I have a personal love of carbon steel tools which are inexpensive and easily shaped to make boring tools etc. These can easily be hardened/tempered in the workshop. Surprisingly, the hardness of a carbon steel will provide a cutting edge that is hard and can exceed HSS but suffers badly if it gets hot when cutting! Once again the home machinist has time, so just take smaller cuts and feeds and keep a wary eye on the colour of the chips. The choice of cutting tools is often determined based on experience and the metal being machined will determine how well the cutting performs resulting in a finish that is pleasing to look at and to size. What always matters is that cutting tools are sharp and the small amount of extra time spent grinding and honing a cutting edge will be worth it.GWH Engineering
creative engineering in a home workshop