


© all rights reserved G W Howe 2017 - 2020
Projects
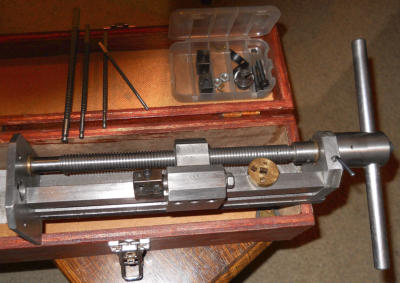
Project to make a Broaching Tool
I wanted to make a set of broaches but like everything else that's not essential it remained as an idea for several years. The broaching tool was initially designed to be simple, yet exploit the use of the lathe and mill and also present a bit of a challenge. The basic requirements were that the broaches (also to be home made) would be 'pulled' rather than pressed. Pressing delicate broaches is a precarious affair and the result is more often than not a snapped broach and a ruined job. As the broaches take some time to make I decided the best approach would be to pull the broach through the work piece as this would present the least amount of strain on the broach and unlike pressing, the broach would be unlikely to 'bend'. With this in mind the basic requirements for a broaching tool were sketched out. The tool would pull the broach using a guide to prevent 'bending' and to make things a bit more interesting the mechanism for the 'pull' movement would be a square thread screw. The majority of the build is made up from hot rolled 50mm x 15mm. In all the time I have owned a lathe I have never made a square thread of any length and to go with it the need for a close fitting nut! The latter is more of a problem and with hindsight I should have made a tap to finish the nut thread, but I decided that as a challenge I could make it without a tap based on the belief that working to close tolerances the two parts should fit together easily. That is the theory, in practice the fitting was difficult to say the least but eventually it mated and resulted in virtually no play. To make things a little easier I made the nut from aluminium which was easy to cut the internal thread and when it came to fitting I used a small amount of lapping compound to get to the final size. The feed screw which was a little over 7 inches long and 0.600" diameter with a 0.050" square thread proved to be a time consuming job. The amount of 'cut' for each pass was around a few thou' each time. As the cutting tool was also 0.050" wide it was quite delicate and could have easily broken so for that reason I kept to the few thou' in-feed. I might add that this approach was learned the hard way. The first time I tried a 0.005" feed, the tool lost its edge and then jammed! Next thing, two gears in the lathe gearbox stripped! The gearbox was one I had made many years ago and the gears were standard Myford gears reduced to 0.3125" thickness. This had served me well over the years but as the gears were made from cast iron and 20dp with 14.5 degree pressure angle the tooth thickness was easily overcome by my mishap! The job was put on hold and I sent off for a gear cutter (if only I had a gear making machine*) to make two more 25t gears which this time would be from mild steel. The gears made and the gearbox back in action the second attempt at the feed screw was started only this time a gentle cut was made and eventually I was very pleased with the finished thread. With a set of broaches to produce square holes now made for 1/8", 5/32", 3/16" & 1/4" this covers most requirements. All of these were made from silver steel and hardened. In addition to the square broaches I have since made a broach to cut a 1/8" key-way slot in a gear wheel. The first attempt making this was a disaster as the silver steel was badly deformed on hardening. Having read that a commercial firm is now making broaches from steel and case hardening I decided to give this a go. Using hot rolled base steel the cutting teeth were filed by hand** and the broach case hardened. There was no discernible deformation and it performed equally as well as the silver steel variety. I think this may now become the preferred material for other than round broaches. * Ref. recent article about making spur gears using the new Gear Generating Machine. ** Although sizes should be accurate for the outside dimensions of a broach the spacing and shaping of the teeth need not be so demanding. In the case of making a key-way broach filing these teeth by hand is easy and quick. The important thing to consider when making a key-way broach is the amount of metal, and type of metal to be removed by each tooth (I aim for 0.002" for soft metals and 0.001" for steel). To cut to the required key-way depth may require several passes of the broach do the job. The first broach pass initially cuts to a depth determined by the broach cutting length and teeth pitch and the subsequent passes use a shim strip in the broach guide raising the height of the same broach cutter by the shim thickness. In the case of broaching key-ways in gears it is a good idea to remove some of the key-way material before broaching. Initially, I did this using a hack-saw but I think it is better and quicker to use a simple jig and drill a 3/32” dia. hole (in the case of 1/8" wide key-way) first and then follow with the broach. A set of A4 sized drawings are available from the PDF link below. (note pc only)GWH Engineering
creative engineering in a home workshop